Difference between revisions of "Board Game"
AlexBot2004 (talk | contribs) m (→Gameplay: Minor corrections/adjustments) |
|||
| (37 intermediate revisions by 9 users not shown) | |||
| Line 1: | Line 1: | ||
| − | {{Wrongpage|the mode in | + | {{Wrongpage|the mode in amiibo Festival|the furniture item of the same name|Board game (item)}} |
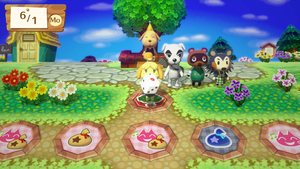
| − | [[File: | + | [[File:aF Press E3 2015 Die Roll.png|thumb|right|Isabelle rolling a die in the Board Game mode]] |
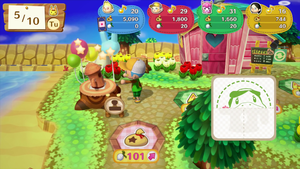
| − | The '''Board Game''', also known as the '''Animal Crossing Board Game''', is the main mode in {{ | + | The '''Board Game''', also known as the '''Animal Crossing Board Game''', is the main mode in {{aF}}. In the Board Game, one to four players scan an ''Animal Crossing'' [[amiibo]] figure and play as the corresponding character. The game takes place within a [[town]], and the players roll a die to move across spaces, which have different effects. The goal is to earn the most [[Happy Point]]s. |
==Gameplay== | ==Gameplay== | ||
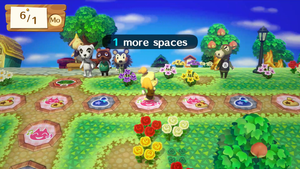
| − | [[File: | + | [[File:aF Press E3 2015 Moving.png|thumb|left|Isabelle moving across the game board]] |
| − | Before each game, the players can scan in amiibo figures; players can also play without amiibo as long at least one is using one. | + | Before each game, the players can scan in amiibo figures; players can also play without amiibo as long at least one is using one. In games with less than four players, computer players use the avatar of a [[player|player character]]; this avatar is also used for non-amiibo players. The turn order is then selected, and the player chooses which month to play in, which determines which [[events]] occur during the game. |
| − | The Board Game has two main spaces: pink spaces and purple spaces. Pink spaces give either [[Happy Point]]s or [[Bell]]s, and purple spaces take away Happy Points or Bells. Each game begins at the beginning of the selected month, and each turn is a single day in the month; the game ends at the end of the month, meaning each game has 28 to 31 turns. Players also have the option to set a time limit of either 30, 45, or 60 minutes on the game, and to turn on hints that appear throughout the game. | + | The Board Game has two main spaces: pink spaces and purple spaces. Pink spaces give either [[Happy Point]]s or [[Bell]]s, and purple spaces take away Happy Points or Bells. Each game begins at the beginning of the selected month, and each turn is a single day in the month; the game ends at the end of the month, meaning each game has 28 to 31 turns. Players also have the option to set a time limit of either 30, 45, or 60 minutes on the game,{{Note|If a time limit is set, the game ends two days after the day it expires on.}} and to turn on hints that appear throughout the game. |
Each player scans their respective amiibo figure to roll a die each turn, determining how many spaces they travel. When they land on a space, a scenario involving the player plays out, with the outcome either rewarding or removing Happy Points or Bells. In addition to scanning their respective amiibo figure, players can scan a resident's amiibo card to have them appear and roll a special die with only the number that is on the card; each player can only do this five times per game. | Each player scans their respective amiibo figure to roll a die each turn, determining how many spaces they travel. When they land on a space, a scenario involving the player plays out, with the outcome either rewarding or removing Happy Points or Bells. In addition to scanning their respective amiibo figure, players can scan a resident's amiibo card to have them appear and roll a special die with only the number that is on the card; each player can only do this five times per game. | ||
| − | [[File: | + | |
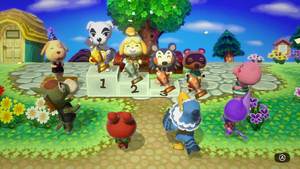
| + | [[File:aF Press E3 2015 Ending.png|thumb|right|The players at the end of a game]] | ||
At the end of the game, the host counts the number of Bells each player has; every 1,000 Bells awards 1 Happy Point. The player with the most Happy Points wins, and the player can review statistics for each player, including the final number of Happy Points, number of spaces moved, number of pink and purple spaces landed on, profit made from turnips, and profit made from Katrina's tarot cards. After the game, each player's Happy Points are saved to their respective amiibo figure to level the character up. | At the end of the game, the host counts the number of Bells each player has; every 1,000 Bells awards 1 Happy Point. The player with the most Happy Points wins, and the player can review statistics for each player, including the final number of Happy Points, number of spaces moved, number of pink and purple spaces landed on, profit made from turnips, and profit made from Katrina's tarot cards. After the game, each player's Happy Points are saved to their respective amiibo figure to level the character up. | ||
| − | After the player completes the Board Game for the first time, they unlock the ability to select the month the game takes place in. After a second completion of the Board Game, the plaza is unlocked, where the player can access minigames. After a third completion, the ability to customize the Board Game town is unlocked. | + | After the player completes the Board Game for the first time, they unlock the ability to select the month the game takes place in; the game uses the current month set on the Wii U for the first playthrough. After a second completion of the Board Game, the plaza is unlocked, where the player can access minigames. After a third completion, the ability to customize the Board Game town is unlocked. |
{{Clear}} | {{Clear}} | ||
===Collectibles=== | ===Collectibles=== | ||
| − | {| class="styled color-minigame" style="text-align:center | + | {| class="styled color-minigame" style="text-align:center;" |
|- | |- | ||
| − | ! | + | ! style="width:10%" | Collectible |
| − | ! | + | ! style="width:30%" | Usage |
| − | |||
|- | |- | ||
| − | | [[Happy Point]] | + | | [[File:Happy Point aF Icon.png]]<br>[[Happy Point]]s |
| − | |||
| The main collectible in the game; the player with the most Happy Points at the end of a game wins. Each player begins the game with 10 Happy Points, and Happy Points can be earned from some pink spaces, certain events, and certain visitors. Additionally, each time a player using amiibo rolls the die, they receive 1 Happy Point. After each game, the players' Happy Points are saved to their amiibo, which can level up the character. | | The main collectible in the game; the player with the most Happy Points at the end of a game wins. Each player begins the game with 10 Happy Points, and Happy Points can be earned from some pink spaces, certain events, and certain visitors. Additionally, each time a player using amiibo rolls the die, they receive 1 Happy Point. After each game, the players' Happy Points are saved to their amiibo, which can level up the character. | ||
|- | |- | ||
| − | | [[ | + | | [[File:Bells aF Icon.png]]<br>[[Bell]]s |
| − | + | | Used as currency to buy turnips from Joan and cards from Redd. At the end of a game, each player receives 1 Happy Point for every 1,000 Bells they have. Each player begins the game with 2,000 Bells, and Bells can be earned from some pink spaces, from selling turnips, from certain events, and from certain visitors. If the player has negative Bells at the end of their turn, they lose one Happy Point. | |
| − | | Used as currency to buy turnips from Joan and cards from Redd. At the end of a game, every 1,000 Bells | ||
|- | |- | ||
| − | + | | [[File:Nia.png|64px]]<br>[[Turnip]]s | |
| − | | [[File:Nia.png|64px]] | ||
| Used as selling items to earn Bells from the stalk market. Turnips can be purchased from Joan each Sunday; on the first Sunday of each game, Joan also gives all players 10 turnips. Turnips can also be obtained from Joan's visits and from collecting green or rainbow feathers during Festivale. | | Used as selling items to earn Bells from the stalk market. Turnips can be purchased from Joan each Sunday; on the first Sunday of each game, Joan also gives all players 10 turnips. Turnips can also be obtained from Joan's visits and from collecting green or rainbow feathers during Festivale. | ||
|} | |} | ||
===Spaces=== | ===Spaces=== | ||
| − | {| class="styled color-minigame" style="text-align:center; width: | + | {| class="styled color-minigame" style="text-align:center; width: 75%;" |
|- | |- | ||
| − | ! | + | ! style="width:10%" | Space |
| − | ! | + | ! style="width:40%" | Effect |
|- | |- | ||
| − | | [[File:Space | + | | [[File:Starting Space aF Artwork.png|75px]] |
| Each player starts the game on this space. | | Each player starts the game on this space. | ||
|- | |- | ||
| − | | [[File:Space | + | | [[File:Good Happy Points Space aF Artwork.png|75px]] |
| Rewards Happy Points. If a player lands on this space while another player is already on it, both players earn Happy Points. | | Rewards Happy Points. If a player lands on this space while another player is already on it, both players earn Happy Points. | ||
|- | |- | ||
| − | | [[File: | + | | [[File:Good Bells Space aF Artwork.png|75px]] |
| Rewards Bells | | Rewards Bells | ||
|- | |- | ||
| − | | [[File: | + | | [[File:Good Bells & Happy Points Space aF Artwork.png|75px]] |
| Rewards Happy Points and Bells | | Rewards Happy Points and Bells | ||
|- | |- | ||
| − | | [[File:Space | + | | [[File:Bad Happy Points Space aF Artwork.png|75px]] |
| Removes Happy Points | | Removes Happy Points | ||
|- | |- | ||
| − | | [[File:Space | + | | [[File:Bad Bells Space aF Artwork.png|75px]] |
| Removes Bells | | Removes Bells | ||
|- | |- | ||
| − | | [[File: | + | | [[File:Bad Bells & Happy Points Space aF Artwork.png|75px]] |
| Removes Happy Points and Bells | | Removes Happy Points and Bells | ||
|- | |- | ||
| − | | [[File:Nia.png| | + | | [[File:Nia.png|75px]] |
| Triggers a special event with a visitor. This space only appears when a character is visiting the town. | | Triggers a special event with a visitor. This space only appears when a character is visiting the town. | ||
|- | |- | ||
| − | | [[File:Nia.png| | + | | [[File:Nia.png|75px]] |
| Gives the player a unique reward themed around an event. This space replaces all other spaces during an event. | | Gives the player a unique reward themed around an event. This space replaces all other spaces during an event. | ||
|} | |} | ||
| Line 73: | Line 70: | ||
Occasionally, a special character visits the town for a turn, turning certain spaces into special-event spaces. | Occasionally, a special character visits the town for a turn, turning certain spaces into special-event spaces. | ||
| − | {| class="styled color-minigame" style="text-align:center | + | {| class="styled color-minigame" style="text-align:center;" |
|- | |- | ||
| − | ! | + | ! style="width:10%" | Visitor |
| − | ! | + | ! style="width:10%" | Special-event space |
| − | + | ! style="width:40%"" | Effect | |
| − | ! | ||
|- | |- | ||
| − | + | | [[File:Shrunk aF Character Icon.png|64px]]<br>[[Dr. Shrunk]] | |
| − | | [[File:Shrunk aF Character Icon.png|64px]] | ||
| [[File:Nia.png|64px]] | | [[File:Nia.png|64px]] | ||
| Dr. Shrunk chooses a joke at random out of four—three dice and one "special schtick"—and tells it to the player. If he chooses a joke about the die number, he gives the player a move card with a matching die value. If he chooses to do his "special schtick", he gives the player a random non-move card. | | Dr. Shrunk chooses a joke at random out of four—three dice and one "special schtick"—and tells it to the player. If he chooses a joke about the die number, he gives the player a move card with a matching die value. If he chooses to do his "special schtick", he gives the player a random non-move card. | ||
|- | |- | ||
| − | + | | [[File:Katie aF Character Icon.png|64px]]<br>[[Katie]] | |
| − | | [[File:Katie aF Character Icon.png|64px]] | + | | [[File:aF Katie Space.png|64px]] |
| − | | [[File: | ||
| If the player does not have any cards, Katie draws a move card. She then asks the player if they think the next card she draws will have a higher or lower die value. If the player is correct, Katie gives the player the second card. If the player is incorrect, nothing happens. | | If the player does not have any cards, Katie draws a move card. She then asks the player if they think the next card she draws will have a higher or lower die value. If the player is correct, Katie gives the player the second card. If the player is incorrect, nothing happens. | ||
If the player has a card, Katie instead asks them to trade for a random non-move card. | If the player has a card, Katie instead asks them to trade for a random non-move card. | ||
|- | |- | ||
| − | + | | [[File:Katrina aF Character Icon.png|64px]]<br>[[Katrina]] | |
| − | | [[File:Katrina aF Character Icon.png|64px]] | + | | [[File:aF Katrina Space.png|64px]] |
| − | | [[File: | ||
| The player arrives at the fortune-teller's shop. Several tarot cards appear on the GamePad, and the player must select one. The card rewards the player with Happy Points and/or Bells when a specific die value is rolled by any player for one week (seven turns). The drawn card has a chance of being reversed, where it will take away Happy Points and/or Bells when a specific die value is rolled. | | The player arrives at the fortune-teller's shop. Several tarot cards appear on the GamePad, and the player must select one. The card rewards the player with Happy Points and/or Bells when a specific die value is rolled by any player for one week (seven turns). The drawn card has a chance of being reversed, where it will take away Happy Points and/or Bells when a specific die value is rolled. | ||
'''Tarot cards:''' | '''Tarot cards:''' | ||
| − | + | {| | |
| − | + | | [[File:The Magician Card aF.png|65px]]<br>[I] The Magician Card | |
| − | + | | When any player rolls a 1, the player who drew the card earns 1 Happy Point and 100 Bells. | |
| − | + | |- | |
| − | + | | [[File:The Celebrant Card aF.png|65px]]<br>[II] The Celebrant Card | |
| − | + | | When any player rolls a 2, the player who drew the card earns 2 Happy Points. | |
| + | |- | ||
| + | | [[File:The Empress Card aF.png|65px]]<br>[III] The Empress Card | ||
| + | | When any player rolls a 3, the player who drew the card earns 300 Bells. | ||
| + | |- | ||
| + | | [[File:The Emperor Card aF.png|65px]]<br>[IV] The Emperor Card | ||
| + | | When any player rolls a 4, the player who drew the card earns 400 Bells. | ||
| + | |- | ||
| + | | [[File:The Cleric Card aF.png|65px]]<br>[V] The Cleric Card | ||
| + | | When any player rolls a 5, the player who drew the card earns 5 Happy Points. | ||
| + | |- | ||
| + | | [[File:The Lovers Card aF.png|65px]]<br>[VI] The Lovers Card | ||
| + | | When any player rolls a 6, the player who drew the card earns 6 Happy Points and 600 Bells. | ||
| + | |} | ||
| + | |||
|- | |- | ||
| − | + | | [[File:Joan aF Character Icon.png|64px]]<br>[[Joan]] | |
| − | | [[File:Joan aF Character Icon.png|64px]] | ||
| [[File:Nia.png|64px]] | | [[File:Nia.png|64px]] | ||
| − | | Joan either gives the player 10 to 30 turnips | + | | Joan either gives the player 10 to 30 turnips, makes them pay 1,000 Bells to "help make things right" after her turnip field was vandalized, or tells the player that all their turnips are spoiled and can no longer be used. |
|- | |- | ||
| − | + | | [[File:Phineas aF Character Icon.png|64px]]<br>[[Phineas]] | |
| − | | [[File:Phineas aF Character Icon.png|64px]] | ||
| [[File:Nia.png|64px]] | | [[File:Nia.png|64px]] | ||
| Phineas spins a roulette to see who wins a prize; each player has a section on the roulette, with the player who landed on the special-event space having a larger section. The player it lands on receives 2,000 to 3,000 Bells. There is also a rainbow-colored section on the roulette; if it lands on it, all players receive 5 Happy Points and 1,000 Bells. | | Phineas spins a roulette to see who wins a prize; each player has a section on the roulette, with the player who landed on the special-event space having a larger section. The player it lands on receives 2,000 to 3,000 Bells. There is also a rainbow-colored section on the roulette; if it lands on it, all players receive 5 Happy Points and 1,000 Bells. | ||
|- | |- | ||
| − | + | | [[File:Redd aF Character Icon.png|64px]]<br>[[Redd]] | |
| − | | [[File:Redd aF Character Icon.png|64px]] | + | | [[File:aF Redd Space.png|64px]] |
| − | | [[File: | ||
| The player visits Crazy Redd's Card Shop, where they can purchase one of four cards for 100 Bells. In addition to the purchase cost, cards cost Bells to use, with the exception of the Change Money Card. | | The player visits Crazy Redd's Card Shop, where they can purchase one of four cards for 100 Bells. In addition to the purchase cost, cards cost Bells to use, with the exception of the Change Money Card. | ||
|} | |} | ||
| Line 124: | Line 128: | ||
Cards are items that give the player a unique ability in place of their standard die roll. They are received from Dr. Shrunk, Katie, and Redd when they visit town; if a player purchases a card from Redd, the card also has a usage cost. Each player can hold up to two cards. | Cards are items that give the player a unique ability in place of their standard die roll. They are received from Dr. Shrunk, Katie, and Redd when they visit town; if a player purchases a card from Redd, the card also has a usage cost. Each player can hold up to two cards. | ||
| − | {| class="styled color-minigame" style="text-align:center; width: | + | {| class="styled color-minigame" style="text-align:center; width: 75%;" |
|- | |- | ||
| − | ! | + | ! style="width:10%" | Card |
| − | ! | + | ! style="width:10%" | Effect |
| − | |||
|- | |- | ||
| − | + | | [[File:Nia.png|64px]]<br>1-6 Card | |
| − | | [[File:Nia.png|64px]] | ||
| Moves the player 1–6 spaces | | Moves the player 1–6 spaces | ||
|- | |- | ||
| − | + | | [[File:Nia.png|64px]]<br>Change Luck Card | |
| − | | [[File:Nia.png|64px]] | ||
| Turns the number of Happy Points the player has into a positive number (e.g. -10 Happy Points becomes 10); can only be used if the player has negative Happy Points | | Turns the number of Happy Points the player has into a positive number (e.g. -10 Happy Points becomes 10); can only be used if the player has negative Happy Points | ||
|- | |- | ||
| − | + | | [[File:Nia.png|64px]]<br>Change Money Card | |
| − | | [[File:Nia.png|64px]] | ||
| Turns the number of Bells the player has into a positive number (e.g. -10 Bells becomes 10); can only be used if the player has negative Bells | | Turns the number of Bells the player has into a positive number (e.g. -10 Bells becomes 10); can only be used if the player has negative Bells | ||
|- | |- | ||
| − | + | | [[File:Nia.png|64px]]<br>Double Dice Card | |
| − | | [[File:Nia.png|64px]] | ||
| Allows the player to roll 2 dice | | Allows the player to roll 2 dice | ||
|- | |- | ||
| − | + | | [[File:Nia.png|64px]]<br>Move 1 Card | |
| − | | [[File:Nia.png|64px]] | ||
| Moves the player 1 space | | Moves the player 1 space | ||
|- | |- | ||
| − | + | | [[File:Nia.png|64px]]<br>Move 2 Card | |
| − | | [[File:Nia.png|64px]] | ||
| Moves the player 2 spaces | | Moves the player 2 spaces | ||
|- | |- | ||
| − | + | | [[File:Nia.png|64px]]<br>Move 3 Card | |
| − | | [[File:Nia.png|64px]] | ||
| Moves the player 3 spaces | | Moves the player 3 spaces | ||
|- | |- | ||
| − | + | | [[File:Nia.png|64px]]<br>Move 4 Card | |
| − | | [[File:Nia.png|64px]] | ||
| Moves the player 4 spaces | | Moves the player 4 spaces | ||
|- | |- | ||
| − | + | | [[File:Nia.png|64px]]<br>Move 5 Card | |
| − | | [[File:Nia.png|64px]] | ||
| Moves the player 5 spaces | | Moves the player 5 spaces | ||
|- | |- | ||
| − | + | | [[File:Nia.png|64px]]<br>Move 6 Card | |
| − | | [[File:Nia.png|64px]] | ||
| Moves the player 6 spaces | | Moves the player 6 spaces | ||
|- | |- | ||
| − | + | | [[File:Nia.png|64px]]<br>Negative Card | |
| − | | [[File:Nia.png|64px]] | ||
| Turns all pink spaces into purple spaces for 1 turn | | Turns all pink spaces into purple spaces for 1 turn | ||
|- | |- | ||
| − | + | | [[File:Nia.png|64px]]<br>Positive Card | |
| − | | [[File:Nia.png|64px]] | ||
| Turns all purple spaces into pink spaces for 1 turn | | Turns all purple spaces into pink spaces for 1 turn | ||
|- | |- | ||
| − | + | | [[File:Nia.png|64px]]<br>Up 'n' Down Card | |
| − | | [[File:Nia.png|64px]] | ||
| Changes the stalk market trend to fluctuating | | Changes the stalk market trend to fluctuating | ||
|} | |} | ||
===Events=== | ===Events=== | ||
| − | Various events occur throughout each month that change the game for one or two days. | + | Various events occur throughout each month that change the game for one or two days. Some events only occur in the North American, European, or Japanese version of the game. |
| − | {| class="styled color-minigame" style="text-align:center | + | {| class="styled color-minigame" style="text-align:center;" |
|- | |- | ||
| − | ! | + | ! style="width:10%" | Event |
| − | ! | + | ! style="width:10%" | Date |
| − | + | ! style="width:20%" | Description | |
| − | ! | ||
|- | |- | ||
| − | + | | [[File:Opposite Day aF Icon.png]]<br>Opposite Day | |
| − | | [[File:Opposite Day aF Icon.png | + | | Random day after the 20th of each month{{Note|name="No calendar"|Does not appear on the calendar.}} |
| − | | Random | + | | Players move backward and the effects of spaces and tarot cards are reversed. Additionally, a space's turnip prices are not revealed until a player lands on it. |
| − | | Players move backward and the effects of spaces are reversed. Additionally, a space's turnip prices are not revealed until a player lands on it. | ||
|- | |- | ||
| − | + | | [[File:Twice Dice Day aF Icon.png]]<br>Twice Dice Day | |
| − | | [[File:Twice Dice Day aF Icon.png | ||
| 11th and 22nd day of each month{{Note|name="No calendar"}} | | 11th and 22nd day of each month{{Note|name="No calendar"}} | ||
| Each player rolls two dice instead of one. If both of a player's rolls match, they receive bonus Happy Points. | | Each player rolls two dice instead of one. If both of a player's rolls match, they receive bonus Happy Points. | ||
|- | |- | ||
| − | + | | [[File:Stalk Market Closed aF Icon.png]]<br>Stalk Market Closed | |
| − | | [[File:Stalk Market Closed aF Icon.png | ||
| Random, cannot occur on Sunday{{Note|name="No calendar"}} | | Random, cannot occur on Sunday{{Note|name="No calendar"}} | ||
| Players cannot sell turnips for one day. | | Players cannot sell turnips for one day. | ||
| + | |- | ||
| + | | [[File:Birthday aF Icon.png]]<br>[[Birthday]] | ||
| + | | The birthday of one of the players' amiibo characters or the host of the game | ||
| + | | All visitor spaces become birthday spaces. | ||
| + | |||
| + | If it is the host's birthday, landing on a birthday space causes the player to meet the host in front of the town tree, and they offer the player either 5 Happy Points or 3,000 Bells. | ||
| + | |||
| + | If it is the birthday of one of the players, landing on a birthday space has a different effect depending on who lands on it. If the birthday player lands on it, they receive 10 Happy Points, and if a non-birthday player lands on it, they receive 3 Happy Points and the birthday player receives 5. | ||
|- | |- | ||
| − | | [[Fishing Tourney]] | + | | [[File:Fishing Tourney aF Icon.png]]<br>[[Fishing Tourney]] |
| − | |||
| 2nd Saturday of February, April, October, and December<br>3rd Saturday of January, March, May, and November | | 2nd Saturday of February, April, October, and December<br>3rd Saturday of January, March, May, and November | ||
| [[Chip]] appears and all spaces become fishing-rod spaces. When a space is landed on, the player catches a random fish. Silver and gold spaces have a higher chance of holding a larger fish. At the end of the turn, the players appear in Chip's tent for an awards ceremony; players are scored based on the size of the largest fish they caught during the day. The first-place player receives 20 Happy Points, the second-place player receives 15, the third-place player receives 10, and the fourth-place player receives 5. | | [[Chip]] appears and all spaces become fishing-rod spaces. When a space is landed on, the player catches a random fish. Silver and gold spaces have a higher chance of holding a larger fish. At the end of the turn, the players appear in Chip's tent for an awards ceremony; players are scored based on the size of the largest fish they caught during the day. The first-place player receives 20 Happy Points, the second-place player receives 15, the third-place player receives 10, and the fourth-place player receives 5. | ||
|- | |- | ||
| − | | [[Bug-Off]] | + | | [[File:Bug-Off aF Icon.png]]<br>[[Bug-Off]] |
| − | |||
| 3rd Saturday of June, July, August, and September | | 3rd Saturday of June, July, August, and September | ||
| [[Nat]] appears and all spaces become net spaces. When a space is landed on, the player catches a random bug. Silver and gold spaces have a higher chance of holding a rarer bug. At the end of the turn, the players appear in Nat's tent for an awards ceremony; players are scored based on the rarity of the rarest bug they caught during the day. The first-place player receives 20 Happy Points, the second-place player receives 15, the third-place player receives 10, and the fourth-place player receives 5. | | [[Nat]] appears and all spaces become net spaces. When a space is landed on, the player catches a random bug. Silver and gold spaces have a higher chance of holding a rarer bug. At the end of the turn, the players appear in Nat's tent for an awards ceremony; players are scored based on the rarity of the rarest bug they caught during the day. The first-place player receives 20 Happy Points, the second-place player receives 15, the third-place player receives 10, and the fourth-place player receives 5. | ||
|- | |- | ||
| − | | [[New Year's Day]] | + | | [[File:New Year's Day aF Icon.png]]<br>[[New Year's Day]] |
| − | |||
| January 1 | | January 1 | ||
| Scenarios themed around the event can occur when landing on spaces. | | Scenarios themed around the event can occur when landing on spaces. | ||
|- | |- | ||
| − | + | | [[File:Festivale aF Icon.png]]<br>[[Festivale]] | |
| − | | [[File:Festivale aF Icon.png | ||
| Day in February or March (varies per year) | | Day in February or March (varies per year) | ||
| [[Pavé]] appears and all spaces turn into feather spaces. When a space is landed on, the player receives the feather indicated on the space and Pavé awards them a prize. Yellow feathers give 3,000 Bells, red feathers give 10 Happy Points, green feathers give 10 turnips, and rainbow feathers give 10 Happy Points, 3,000 Bells, and 10 turnips. | | [[Pavé]] appears and all spaces turn into feather spaces. When a space is landed on, the player receives the feather indicated on the space and Pavé awards them a prize. Yellow feathers give 3,000 Bells, red feathers give 10 Happy Points, green feathers give 10 turnips, and rainbow feathers give 10 Happy Points, 3,000 Bells, and 10 turnips. | ||
|- | |- | ||
| − | | [[Groundhog Day]] | + | | [[File:Groundhog Day aF Icon.png]]<br>[[Groundhog Day]] |
| − | |||
| February 2{{Note|name="NA"|This event only occurs in the North American version of the game.}} | | February 2{{Note|name="NA"|This event only occurs in the North American version of the game.}} | ||
| Scenarios themed around the event can occur when landing on spaces. | | Scenarios themed around the event can occur when landing on spaces. | ||
|- | |- | ||
| − | | [[ | + | | [[File:Setsubun aF Icon.png|64px]]<br>[[Bean Day|Setsubun]] |
| − | | [[File:Valentine's Day aF Icon.png | + | | February 3{{Note|name="JP"|This event only occurs in the Japanese version of the game.}} |
| + | | Scenarios themed around the event can occur when landing on spaces. | ||
| + | |- | ||
| + | | [[File:Valentine's Day aF Icon.png]]<br>[[Valentine's Day]] | ||
| February 14 | | February 14 | ||
| Scenarios themed around the event can occur when landing on spaces. | | Scenarios themed around the event can occur when landing on spaces. | ||
|- | |- | ||
| − | | [[ | + | | [[File:Doll's Festival aF Icon.png]]<br>[[Hinamatsuri|Doll's Festival]] |
| − | | [[File:Bunny Day aF Icon.png | + | | March 3{{Note|name="JP"}} |
| + | | Scenarios themed around the event can occur when landing on spaces. | ||
| + | |- | ||
| + | | [[File:White Day aF Icon.png|64px]]<br>[[Valentine's Day|White Day]] | ||
| + | | March 14{{Note|name="JP"}} | ||
| + | | Scenarios themed around the event can occur when landing on spaces. | ||
| + | |- | ||
| + | | [[File:Shamrock Day aF Icon.png]]<br>[[Shamrock Day]] | ||
| + | | March 17{{Note|name="NA"}} | ||
| + | | Scenarios themed around the event can occur when landing on spaces. | ||
| + | |- | ||
| + | | [[File:Bunny Day aF Icon.png]]<br>[[Bunny Day]] | ||
| Day in March or April (varies per year) | | Day in March or April (varies per year) | ||
| [[Zipper T. Bunny]] appears and all spaces turn into egg spaces. When a space is walked over, the player receives eggs, and after they stop moving, they receive a corresponding number of Happy Points. Green spaces give 1–2 eggs, silver spaces give 4–5 eggs, and gold spaces give 10 eggs. | | [[Zipper T. Bunny]] appears and all spaces turn into egg spaces. When a space is walked over, the player receives eggs, and after they stop moving, they receive a corresponding number of Happy Points. Green spaces give 1–2 eggs, silver spaces give 4–5 eggs, and gold spaces give 10 eggs. | ||
|- | |- | ||
| − | + | | [[File:April Fools' Day aF Icon.png]]<br>[[April Fools' Day]] | |
| − | | [[File: | ||
| − | |||
| − | |||
| − | |||
| − | |||
| − | |||
| April 1 | | April 1 | ||
| Scenarios themed around the event can occur when landing on spaces. | | Scenarios themed around the event can occur when landing on spaces. | ||
|- | |- | ||
| − | | [[Nature Day]] | + | | [[File:Nature Day aF Icon.png]]<br>[[Nature Day]] |
| − | |||
| April 22 | | April 22 | ||
| Scenarios themed around the event can occur when landing on spaces. | | Scenarios themed around the event can occur when landing on spaces. | ||
|- | |- | ||
| − | | [[Weeding Day]] | + | | [[File:Weeding Day aF Icon.png]]<br>[[Weeding Day]] |
| − | |||
| Last Friday of April | | Last Friday of April | ||
| Scenarios themed around the event can occur when landing on spaces. | | Scenarios themed around the event can occur when landing on spaces. | ||
|- | |- | ||
| − | | [[ | + | | [[File:Children's Day aF Icon.png|64px]]<br>[[Children's Day]] |
| − | | [[File:Mother's Day aF Icon.png | + | | May 5{{Note|name="JP"}} |
| + | | Scenarios themed around the event can occur when landing on spaces. | ||
| + | |- | ||
| + | | [[File:Mother's Day aF Icon.png]]<br>[[Mother's Day]] | ||
| 2nd Sunday of May | | 2nd Sunday of May | ||
| Scenarios themed around the event can occur when landing on spaces. | | Scenarios themed around the event can occur when landing on spaces. | ||
|- | |- | ||
| − | | [[Father's Day]] | + | | [[File:Father's Day aF Icon.png]]<br>[[Father's Day]] |
| − | |||
| 3rd Sunday of June | | 3rd Sunday of June | ||
| Scenarios themed around the event can occur when landing on spaces. | | Scenarios themed around the event can occur when landing on spaces. | ||
|- | |- | ||
| − | | [[Summer Solstice]] | + | | [[File:Summer Solstice aF Icon.png]]<br>[[Summer Solstice]] |
| − | |||
| June 21 | | June 21 | ||
| Scenarios themed around the event can occur when landing on spaces. | | Scenarios themed around the event can occur when landing on spaces. | ||
|- | |- | ||
| − | | [[ | + | | [[File:Tanabata aF Icon.png|64px]]<br>[[Starcrossed Day|Tanabata]] |
| − | | [[File:Fireworks Show aF Icon.png | + | | March 14{{Note|name="JP"}} |
| + | | Scenarios themed around the event can occur when landing on spaces. | ||
| + | |- | ||
| + | | [[File:Marine Day aF Icon.png|64px]]<br>[[Marine Day]] | ||
| + | | July 18{{Note|name="JP"}} | ||
| + | | Scenarios themed around the event can occur when landing on spaces. | ||
| + | |- | ||
| + | | [[File:Fireworks Show aF Icon.png]]<br>[[Fireworks Show]] | ||
| Each Sunday in August | | Each Sunday in August | ||
| Redd appears in a stall and special-event spaces appear on the board. Landing on one of these spaces brings the player to the stall, where they can purchase a Happy Fox Fortune for 100 Bells. Additionally, scenarios themed around the event can occur when landing on spaces. | | Redd appears in a stall and special-event spaces appear on the board. Landing on one of these spaces brings the player to the stall, where they can purchase a Happy Fox Fortune for 100 Bells. Additionally, scenarios themed around the event can occur when landing on spaces. | ||
| Line 288: | Line 291: | ||
*Lot 3 - Small Prize! – 2 Happy Points | *Lot 3 - Small Prize! – 2 Happy Points | ||
|- | |- | ||
| − | | [[ | + | | [[File:Obon aF Icon.png|64px]]<br>[[Obon]] |
| − | | [[File:Autumn Moon aF Icon.png | + | | August 15{{Note|name="JP"}} |
| + | | Scenarios themed around the event can occur when landing on spaces. | ||
| + | |- | ||
| + | | [[File:Autumn Moon aF Icon.png]]<br>[[Autumn Moon]] | ||
| Day in September or October (varies per year) | | Day in September or October (varies per year) | ||
| Scenarios themed around the event can occur when landing on spaces. | | Scenarios themed around the event can occur when landing on spaces. | ||
|- | |- | ||
| − | | [[Labor Day]] | + | | [[File:Labor Day aF Icon.png]]<br>[[Labor Day]] |
| − | |||
| 1st Monday of September | | 1st Monday of September | ||
| Scenarios themed around the event can occur when landing on spaces. | | Scenarios themed around the event can occur when landing on spaces. | ||
|- | |- | ||
| − | | [[Explorer's Day]] | + | | [[File:Explorer's Day aF Icon.png]]<br>[[Explorer's Day]] |
| − | |||
| 2nd Monday of October | | 2nd Monday of October | ||
| Scenarios themed around the event can occur when landing on spaces. | | Scenarios themed around the event can occur when landing on spaces. | ||
|- | |- | ||
| − | + | | [[File:Halloween aF Icon.png]]<br>[[Halloween]] | |
| − | | [[File:Halloween aF Icon.png | ||
| October 31 | | October 31 | ||
| [[Jack]] appears on October 1 and scatters pieces of candy across the town. Throughout the month, players can collect the candy; candy appears floating between spaces in groups of 3 or 5. At the end of the day on October 31, Jack appears again and depending on how much candy was collected in total, gives all the players Happy Points. If 180 or more pieces of candy were collected throughout the month, Jack gives all players 20 Happy Points. He then gives each player a different amount of bonus Happy Points based on how much candy they collected; first-place receives 20 Happy Points, second-place receives 15, third-place receives 10, and fourth-place receives 5. | | [[Jack]] appears on October 1 and scatters pieces of candy across the town. Throughout the month, players can collect the candy; candy appears floating between spaces in groups of 3 or 5. At the end of the day on October 31, Jack appears again and depending on how much candy was collected in total, gives all the players Happy Points. If 180 or more pieces of candy were collected throughout the month, Jack gives all players 20 Happy Points. He then gives each player a different amount of bonus Happy Points based on how much candy they collected; first-place receives 20 Happy Points, second-place receives 15, third-place receives 10, and fourth-place receives 5. | ||
|- | |- | ||
| − | + | | [[File:Harvest Festival aF Icon.png]]<br>[[Turkey Day|Harvest Festival]] | |
| − | | [[File:Harvest Festival aF Icon.png| | ||
| 4th Wednesday and Thursday of November | | 4th Wednesday and Thursday of November | ||
| [[Franklin]] appears the day before the Harvest Festival and asks the players to bring him three ingredients. During both days, spaces become ingredient spaces, which when landed on give the player the ingredient indicated on the space. Each ingredient collected awards the player Happy Points. On the day of the Harvest Festival, Franklin asks the players to collect a secret ingredient. At the end of the turn, Franklin uses the players' ingredients to cook a dish, and each player receives Happy Points; the more ingredients are brought to Franklin, the more Happy Points are received. | | [[Franklin]] appears the day before the Harvest Festival and asks the players to bring him three ingredients. During both days, spaces become ingredient spaces, which when landed on give the player the ingredient indicated on the space. Each ingredient collected awards the player Happy Points. On the day of the Harvest Festival, Franklin asks the players to collect a secret ingredient. At the end of the turn, Franklin uses the players' ingredients to cook a dish, and each player receives Happy Points; the more ingredients are brought to Franklin, the more Happy Points are received. | ||
|- | |- | ||
| − | | [[Naughty-or-Nice Day]] | + | | [[File:Naughty-or-Nice Day aF Icon.png]]<br>[[Naughty-or-Nice Day]] |
| − | |||
| December 6{{Note|name="EU"|This event only occurs in the European version of the game.}} | | December 6{{Note|name="EU"|This event only occurs in the European version of the game.}} | ||
| Scenarios themed around the event can occur when landing on spaces. | | Scenarios themed around the event can occur when landing on spaces. | ||
|- | |- | ||
| − | | [[Winter Solstice]] | + | | [[File:Winter Solstice aF Icon.png]]<br>[[Winter Solstice]] |
| − | |||
| December 21 | | December 21 | ||
| Scenarios themed around the event can occur when landing on spaces. | | Scenarios themed around the event can occur when landing on spaces. | ||
|- | |- | ||
| − | | [[Toy Day]] | + | | [[File:Toy Day aF Icon.png]]<br>[[Toy Day]] |
| − | |||
| December 24 | | December 24 | ||
| [[Jingle]] appears and gives all players 5 Happy Points and 3,000 Bells. | | [[Jingle]] appears and gives all players 5 Happy Points and 3,000 Bells. | ||
|- | |- | ||
| − | | [[ | + | | [[File:New Year's Eve aF Icon.png]]<br>[[Countdown|New Year's Eve]] |
| − | |||
| December 31 | | December 31 | ||
| Scenarios themed around the event can occur when landing on spaces. | | Scenarios themed around the event can occur when landing on spaces. | ||
| Line 335: | Line 333: | ||
===Stalk market=== | ===Stalk market=== | ||
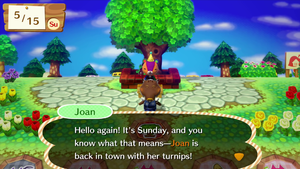
| − | [[File: | + | [[File:aF Joan Visit Sunday.png|thumb|left|Joan visiting the town on a Sunday to sell turnips]] |
| − | Each Sunday after the first week of the game, [[Joan]] visits and gives each player the option to purchase turnips with Bells; the first time she visits, she also gives each player 10 free turnips. Throughout the week, the player can sell them on each space, which | + | Each Sunday after the first week of the game, [[Joan]] visits and gives each player the option to purchase turnips with Bells; the first time she visits, she also gives each player 10 free turnips. Throughout the week, the player can sell them on each space, each of which has a different price. Each Monday, the host tells the players which trend the stalk market is in for the week: steady, fluctuating, or crashing. If the player has turnips on a Saturday or the final day of the game, they are automatically sold at the space they land on, unless the stalk market happens to be closed on that day. |
{{Clear}} | {{Clear}} | ||
===Gyroid Stamp Spot=== | ===Gyroid Stamp Spot=== | ||
| − | [[File: | + | [[File:aF Gyroid Stamp Spot.png|thumb|right|A player getting their card stamped at a Gyroid Stamp Spot]] |
| − | On each corner of the board, there is a Gyroid Stamp Spot. If a player passes the spot, they will have one-quarter of a card stamped, revealing an image of a character, and the player earns Happy Points. Once all four sections of a stamp have been filled in, the card can be stamped two more times to add additional elements to the image. There are a total of 26 stamps. | + | On each corner of the board, there is a Gyroid Stamp Spot. If a player passes the spot, they will have one-quarter of a card stamped, revealing an image of a character, and the player earns Happy Points. Once all four sections of a stamp have been filled in, the card can be stamped two more times to add additional elements to the image. Once the stamp is completed, subsequent passes of the Gyroid Stamp Spot still give the player Happy Points. There are a total of 26 stamps, and they vary by month. |
*1 stamp – 5 Happy Points | *1 stamp – 5 Happy Points | ||
*2 stamps – 10 Happy Points | *2 stamps – 10 Happy Points | ||
*3 stamps – 15 Happy Points | *3 stamps – 15 Happy Points | ||
*4 stamps – 30 Happy Points | *4 stamps – 30 Happy Points | ||
| − | *5 stamps – | + | *5 or more stamps – 5 Happy Points |
| − | |||
{{Clear}} | {{Clear}} | ||
| + | ====List of stamps==== | ||
<gallery> | <gallery> | ||
Isabelle Stamp 1 AF.png|[[Isabelle]] | Isabelle Stamp 1 AF.png|[[Isabelle]] | ||
| Line 373: | Line 371: | ||
Carmen and Blanca Stamp 3 AF.png | Carmen and Blanca Stamp 3 AF.png | ||
Shrunk Stamp 1 AF.png|[[Dr. Shrunk]] | Shrunk Stamp 1 AF.png|[[Dr. Shrunk]] | ||
| − | Shrunk Stamp | + | Shrunk Stamp 2 AF.png |
Shrunk Stamp 3 AF.png | Shrunk Stamp 3 AF.png | ||
Leilani Stamp 1 AF.png|[[Leilani]] | Leilani Stamp 1 AF.png|[[Leilani]] | ||
| Line 431: | Line 429: | ||
</gallery> | </gallery> | ||
| − | == | + | ==Board and town== |
| − | + | There are eight possible board layouts, with each having different paths. One is chosen at random the first time the Board Game is played, and it cannot be changed afterward. | |
| − | |||
| − | |||
| − | |||
| − | |||
| − | |||
| − | |||
| − | |||
| − | |||
| − | |||
| − | |||
| − | |||
| − | |||
| − | |||
| − | |||
| − | |||
| − | |||
| − | |||
| − | |||
| − | |||
| − | |||
| − | |||
| − | |||
| − | |||
| − | |||
| − | |||
| − | |||
| − | |||
| − | |||
| − | |||
| − | |||
| − | |||
| − | |||
| − | |||
| − | |||
| − | |||
| − | |||
| − | |||
| − | |||
| − | |||
| − | |||
| − | |||
| − | |||
| − | |||
| − | |||
| − | |||
| − | |||
| − | |||
| − | |||
| − | |||
| − | |||
| − | |||
| − | |||
| − | |||
| − | |||
| − | |||
| − | |||
| − | |||
| − | |||
| − | |||
| − | |||
| − | |||
| − | |||
| − | |||
| − | |||
| − | |||
| − | |||
| − | |||
| − | |||
| − | |||
| − | |||
| − | |||
| − | |||
| − | |||
| − | |||
| − | |||
| − | |||
| − | |||
| − | |||
| − | |||
| − | |||
| − | |||
| − | |||
| − | |||
| − | |||
| − | |||
| − | |||
| − | |||
| − | |||
| − | |||
| − | |||
| − | |||
| − | |||
| − | |||
| − | |||
| − | |||
| − | |||
| − | |||
| − | |||
| − | |||
| − | |||
| − | |||
| − | |||
| − | |||
| − | |||
| − | |||
| − | |||
| − | |||
| − | |||
| − | |||
| − | |||
| − | |||
| − | |||
| − | |||
| − | |||
| − | |||
| − | |||
| − | |||
| − | |||
| − | |||
| − | |||
| − | |||
| − | |||
| − | |||
| − | |||
| − | |||
| − | |||
| − | |||
| − | |||
| − | |||
| − | |||
| − | |||
| − | |||
| − | |||
| − | |||
| − | |||
| − | |||
| − | |||
| − | |||
| − | |||
| − | |||
| − | |||
| − | |||
| − | |||
| − | |||
| − | |||
| − | |||
| − | |||
| − | |||
| − | |||
| − | |||
| − | |||
| − | |||
| − | |||
| − | |||
| − | |||
| − | |||
| − | |||
| − | |||
| − | |||
| − | |||
| − | |||
| − | |||
| − | |||
| − | |||
| − | |||
| − | |||
| − | |||
| − | |||
| − | |||
| − | |||
| − | |||
| − | |||
| − | |||
| − | |||
| − | |||
| − | |||
| − | |||
| − | |||
| − | |||
| − | |||
| − | |||
| − | |||
| − | |||
| − | |||
| − | |||
| − | |||
| − | |||
| − | |||
| − | |||
| − | |||
| − | |||
| − | |||
| − | |||
| − | |||
| − | |||
| − | |||
| − | |||
| − | |||
| − | |||
| − | |||
| − | |||
| − | |||
| − | |||
| − | |||
| − | |||
| − | |||
| − | |||
| − | |||
| − | |||
| − | |||
| − | |||
| − | |||
| − | |||
| − | |||
| − | |||
| − | |||
After the player completes three games, the option to customize the board-game town is unlocked. Before each game, the player can select the option on the GamePad. When customizing the town, the player can invite villagers to move in by scanning their amiibo cards, and spend Happy Tickets on new features. | After the player completes three games, the option to customize the board-game town is unlocked. Before each game, the player can select the option on the GamePad. When customizing the town, the player can invite villagers to move in by scanning their amiibo cards, and spend Happy Tickets on new features. | ||
===Villagers=== | ===Villagers=== | ||
| − | [[File: | + | [[File:aF Villager Move In.png|thumb|right|[[Bluebear]] moving into the Board Game town after her amiibo card was scanned]] |
| − | When moving in a villager, the player has the option to build their home on an open plot of land. If the amiibo card has {{HHD}} home data on it, the house built will match the data on the card. If the maximum of eight villager houses are occupied, the player can replace an existing villager and house. If a villager already lives in the town, the player can build a new house for them. | + | By default, the board-game town is inhabited by [[Goldie]], [[Rosie]], and [[Stitches]]. When moving in a villager, the player has the option to build their home on an open plot of land. If the amiibo card has {{HHD}} home data on it, the house built will match the data on the card. If the maximum of eight villager houses are occupied, the player can replace an existing villager and house. If a villager already lives in the town, the player can build a new house for them. |
| − | Villagers appear throughout the town and in scenarios, and one villager is the host of each game. | + | Villagers appear throughout the town and in scenarios, and one random villager is the host of each game. Goldie is always the host of the first game. |
===Features=== | ===Features=== | ||
| − | Features are similar to [[public works project]]s from {{NL}}. They can be built in exchange for [[Happy Ticket]]s, and once built they can unlock new scenarios and paths on the board. Most features can be demolished once built, but some cannot. | + | Features are similar to [[public works project]]s from {{NL}}. They can be built in exchange for [[Happy Ticket]]s, and once built they can unlock new scenarios and paths on the board. Most features can be demolished once built, but some cannot. There are a total of 30 features: |
{{Clear}} | {{Clear}} | ||
| − | {| class="styled color-minigame" style="text-align:center; width: | + | {| class="styled color-minigame" style="text-align:center; width:75%;" |
| + | |- | ||
| + | ! style="width:10%" | Feature | ||
| + | ! style="width:10%" | Image | ||
| + | ! style="width:10%" | Cost | ||
| + | ! style="width:10%" | Effect on board | ||
| + | ! style="width:10%" | Can demolish | ||
|- | |- | ||
| − | + | | Flowerbed | |
| − | |||
| − | |||
| − | |||
| − | |||
| − | |||
| − | |||
| [[File:Nia.png|64px]] | | [[File:Nia.png|64px]] | ||
| − | | | + | | {{Currency|Happy Tickets|3}} |
| | | | ||
| Yes | | Yes | ||
|- | |- | ||
| − | | | + | | Orchard |
| [[File:Nia.png|64px]] | | [[File:Nia.png|64px]] | ||
| − | | | + | | {{Currency|Happy Tickets|3}} |
| | | | ||
| Yes | | Yes | ||
|- | |- | ||
| − | | | + | | Lotus pond |
| [[File:Nia.png|64px]] | | [[File:Nia.png|64px]] | ||
| − | | | + | | {{Currency|Happy Tickets|3}} |
| | | | ||
| − | | | + | | Yes |
|- | |- | ||
| − | | | + | | Forest glade |
| [[File:Nia.png|64px]] | | [[File:Nia.png|64px]] | ||
| − | | | + | | {{Currency|Happy Tickets|3}} |
| | | | ||
| Yes | | Yes | ||
|- | |- | ||
| − | | | + | | Meeting place |
| [[File:Nia.png|64px]] | | [[File:Nia.png|64px]] | ||
| − | | | + | | {{Currency|Happy Tickets|3}} |
| | | | ||
| − | | | + | | Yes |
|- | |- | ||
| − | | | + | | Campfire |
| [[File:Nia.png|64px]] | | [[File:Nia.png|64px]] | ||
| − | | | + | | {{Currency|Happy Tickets|3}} |
| | | | ||
| Yes | | Yes | ||
|- | |- | ||
| − | | | + | | Well |
| [[File:Nia.png|64px]] | | [[File:Nia.png|64px]] | ||
| − | | | + | | {{Currency|Happy Tickets|3}} |
| | | | ||
| Yes | | Yes | ||
|- | |- | ||
| − | | | + | | Wheat field |
| [[File:Nia.png|64px]] | | [[File:Nia.png|64px]] | ||
| − | | | + | | {{Currency|Happy Tickets|3}} |
| | | | ||
| Yes | | Yes | ||
| − | |- | + | |- |
| − | | | + | | Bamboo forest |
| [[File:Nia.png|64px]] | | [[File:Nia.png|64px]] | ||
| − | | | + | | {{Currency|Happy Tickets|3}} |
| | | | ||
| Yes | | Yes | ||
|- | |- | ||
| − | | | + | | Fountain park |
| [[File:Nia.png|64px]] | | [[File:Nia.png|64px]] | ||
| − | | | + | | {{Currency|Happy Tickets|3}} |
| | | | ||
| Yes | | Yes | ||
|- | |- | ||
| − | | | + | | Playground |
| [[File:Nia.png|64px]] | | [[File:Nia.png|64px]] | ||
| − | | | + | | {{Currency|Happy Tickets|3}} |
| | | | ||
| Yes | | Yes | ||
|- | |- | ||
| − | | | + | | Sandbox |
| [[File:Nia.png|64px]] | | [[File:Nia.png|64px]] | ||
| − | | | + | | {{Currency|Happy Tickets|3}} |
| | | | ||
| Yes | | Yes | ||
|- | |- | ||
| − | | | + | | Statue fountain |
| [[File:Nia.png|64px]] | | [[File:Nia.png|64px]] | ||
| − | | | + | | {{Currency|Happy Tickets|3}} |
| | | | ||
| Yes | | Yes | ||
|- | |- | ||
| − | | | + | | Illuminations |
| [[File:Nia.png|64px]] | | [[File:Nia.png|64px]] | ||
| − | | | + | | {{Currency|Happy Tickets|3}} |
| | | | ||
| Yes | | Yes | ||
|- | |- | ||
| − | | | + | | Rose garden |
| [[File:Nia.png|64px]] | | [[File:Nia.png|64px]] | ||
| − | | | + | | {{Currency|Happy Tickets|3}} |
| | | | ||
| Yes | | Yes | ||
|- | |- | ||
| − | | | + | | Topiary garden |
| [[File:Nia.png|64px]] | | [[File:Nia.png|64px]] | ||
| − | | | + | | {{Currency|Happy Tickets|3}} |
| | | | ||
| Yes | | Yes | ||
|- | |- | ||
| − | | | + | | Zen garden |
| [[File:Nia.png|64px]] | | [[File:Nia.png|64px]] | ||
| − | | | + | | {{Currency|Happy Tickets|3}} |
| | | | ||
| − | | | + | | Yes |
|- | |- | ||
| − | | | + | | Fairy-tale park |
| [[File:Nia.png|64px]] | | [[File:Nia.png|64px]] | ||
| − | | | + | | {{Currency|Happy Tickets|3}} |
| | | | ||
| Yes | | Yes | ||
| − | |- | + | |- |
| − | | | + | | Brunch spot |
| [[File:Nia.png|64px]] | | [[File:Nia.png|64px]] | ||
| − | | | + | | {{Currency|Happy Tickets|3}} |
| | | | ||
| Yes | | Yes | ||
|- | |- | ||
| − | | | + | | Stonehenge |
| [[File:Nia.png|64px]] | | [[File:Nia.png|64px]] | ||
| − | | | + | | {{Currency|Happy Tickets|3}} |
| | | | ||
| Yes | | Yes | ||
|- | |- | ||
| − | | | + | | Lighthouse |
| [[File:Nia.png|64px]] | | [[File:Nia.png|64px]] | ||
| − | | | + | | {{Currency|Happy Tickets|3}} |
| | | | ||
| − | | | + | | Yes |
|- | |- | ||
| − | | | + | | Windmill |
| [[File:Nia.png|64px]] | | [[File:Nia.png|64px]] | ||
| − | | | + | | {{Currency|Happy Tickets|3}} |
| | | | ||
| Yes | | Yes | ||
|- | |- | ||
| − | | | + | | Power plant |
| [[File:Nia.png|64px]] | | [[File:Nia.png|64px]] | ||
| − | | | + | | {{Currency|Happy Tickets|3}} |
| | | | ||
| Yes | | Yes | ||
|- | |- | ||
| − | | | + | | Public restroom |
| [[File:Nia.png|64px]] | | [[File:Nia.png|64px]] | ||
| − | | | + | | {{Currency|Happy Tickets|3}} |
| | | | ||
| Yes | | Yes | ||
|- | |- | ||
| − | | | + | | Pool |
| [[File:Nia.png|64px]] | | [[File:Nia.png|64px]] | ||
| − | | | + | | {{Currency|Happy Tickets|3}} |
| | | | ||
| Yes | | Yes | ||
|- | |- | ||
| − | | | + | | Outdoor theater |
| [[File:Nia.png|64px]] | | [[File:Nia.png|64px]] | ||
| − | | | + | | {{Currency|Happy Tickets|3}} |
| | | | ||
| Yes | | Yes | ||
|- | |- | ||
| − | | | + | | Campsite |
| [[File:Nia.png|64px]] | | [[File:Nia.png|64px]] | ||
| − | | | + | | {{Currency|Happy Tickets|5}} |
| | | | ||
| − | | | + | | No |
|- | |- | ||
| − | | | + | | Police station |
| [[File:Nia.png|64px]] | | [[File:Nia.png|64px]] | ||
| − | | | + | | {{Currency|Happy Tickets|5}} |
| | | | ||
| − | | | + | | No |
|- | |- | ||
| − | | | + | | Reset Center |
| [[File:Nia.png|64px]] | | [[File:Nia.png|64px]] | ||
| − | | | + | | {{Currency|Happy Tickets|5}} |
| | | | ||
| − | | | + | | No |
|- | |- | ||
| − | | | + | | Café |
| [[File:Nia.png|64px]] | | [[File:Nia.png|64px]] | ||
| − | | | + | | {{Currency|Happy Tickets|5}} |
| | | | ||
| − | | | + | | No |
| + | |} | ||
| + | |||
| + | ==Characters== | ||
| + | Every character with an ''Animal Crossing'' amiibo figure is playable in the Board Game. Player characters are reserved for computer players and non-amiibo players, and they cannot be leveled up. Each amiibo character can level up by collecting Happy Points; each level-up unlocks a new outfit and [[Reaction|emotion]] for that character. | ||
| + | *Lv. 1 – ''Default'' | ||
| + | *Lv. 2 – 200 Happy Points | ||
| + | *Lv. 3 – 700 Happy Points | ||
| + | *Lv. 4 – 1,500 Happy Points | ||
| + | *Lv. 5 – 3,000 Happy Points | ||
| + | *Lv. 6 – 7,000 Happy Points | ||
| + | |||
| + | {| class="styled color-minigame" style="text-align:center;" | ||
| + | |- | ||
| + | ! style="width:10%" | Name | ||
| + | ! style="width:10%" | Default outfit | ||
| + | ! style="width:10%" | Lv. 2 outfit | ||
| + | ! style="width:10%" | Lv. 3 outfit | ||
| + | ! style="width:10%" | Lv. 4 outfit | ||
| + | ! style="width:10%" | Lv. 5 outfit | ||
| + | ! style="width:10%" | Lv. 6 outfit | ||
| + | |- | ||
| + | | [[File:Blathers aF Character Icon.png|64px]]<br>[[Blathers]] | ||
| + | | [[File:aF Blathers.png|64px]] | ||
| + | | [[File:aF Blathers Lv. 2 Outfit.png|64px]] | ||
| + | | [[File:aF Blathers Lv. 3 Outfit.png|64px]] | ||
| + | | [[File:aF Blathers Lv. 4 Outfit.png|64px]] | ||
| + | | [[File:aF Blathers Lv. 5 Outfit.png|64px]] | ||
| + | | [[File:aF Blathers Lv. 6 Outfit.png|64px]] | ||
| + | |- | ||
| + | | [[File:Celeste aF Character Icon.png|64px]]<br>[[Celeste]] | ||
| + | | [[File:aF Celeste.png|64px]] | ||
| + | | [[File:aF Celeste Lv. 2 Outfit.png|64px]] | ||
| + | | [[File:aF Celeste Lv. 3 Outfit.png|64px]] | ||
| + | | [[File:aF Celeste Lv. 4 Outfit.png|64px]] | ||
| + | | [[File:aF Celeste Lv. 5 Outfit.png|64px]] | ||
| + | | [[File:aF Celeste Lv. 6 Outfit.png|64px]] | ||
| + | |- | ||
| + | | [[File:Cyrus aF Character Icon.png|64px]]<br>[[Cyrus]] | ||
| + | | [[File:aF Cyrus.png|64px]] | ||
| + | | [[File:aF Cyrus Lv. 2 Outfit.png|64px]] | ||
| + | | [[File:aF Cyrus Lv. 3 Outfit.png|64px]] | ||
| + | | [[File:aF Cyrus Lv. 4 Outfit.png|64px]] | ||
| + | | [[File:aF Cyrus Lv. 5 Outfit.png|64px]] | ||
| + | | [[File:aF Cyrus Lv. 6 Outfit.png|64px]] | ||
| + | |- | ||
| + | | [[File:Digby aF Character Icon.png|64px]]<br>[[Digby]] | ||
| + | | [[File:aF Digby.png|64px]] | ||
| + | | [[File:aF Digby Lv. 2 Outfit.png|64px]] | ||
| + | | [[File:aF Digby Lv. 3 Outfit.png|64px]] | ||
| + | | [[File:aF Digby Lv. 4 Outfit.png|64px]] | ||
| + | | [[File:aF Digby Lv. 5 Outfit.png|64px]] | ||
| + | | [[File:aF Digby Lv. 6 Outfit.png|64px]] | ||
| + | |- | ||
| + | | [[File:Isabelle aF Character Icon.png|64px]]<br>[[Isabelle]]{{Note|Isabelle's default outfit and Lv. 2 outfit differ between the Summer Outfit and Winter Outfit amiibo figures.}} | ||
| + | | align=center colspan=2 | [[File:aF Isabelle (Summer Outfit).png|64px]] [[File:aF Isabelle (Winter Outfit).png|64px]] | ||
| + | | [[File:aF Isabelle Lv. 3 Outfit.png|64px]] | ||
| + | | [[File:aF Isabelle Lv. 4 Outfit.png|64px]] | ||
| + | | [[File:aF Isabelle Lv. 5 Outfit.png|64px]] | ||
| + | | [[File:aF Isabelle Lv. 6 Outfit.png|64px]] | ||
| + | |- | ||
| + | | [[File:K.K. aF Character Icon.png|64px]]<br>[[K.K. Slider]] | ||
| + | | [[File:aF K.K. Slider.png|64px]] | ||
| + | | [[File:aF K.K. Slider Lv. 2 Outfit.png|64px]] | ||
| + | | [[File:aF K.K. Slider Lv. 3 Outfit.png|64px]] | ||
| + | | [[File:aF K.K. Slider Lv. 4 Outfit.png|64px]] | ||
| + | | [[File:aF K.K. Slider Lv. 5 Outfit.png|64px]] | ||
| + | | [[File:aF K.K. Slider Lv. 6 Outfit.png|64px]] | ||
| + | |- | ||
| + | | [[File:Kapp'n aF Character Icon.png|64px]]<br>[[Kapp'n]] | ||
| + | | [[File:aF Kapp'n.png|64px]] | ||
| + | | [[File:aF Kapp'n Lv. 2 Outfit.png|64px]] | ||
| + | | [[File:aF Kapp'n Lv. 3 Outfit.png|64px]] | ||
| + | | [[File:aF Kapp'n Lv. 4 Outfit.png|64px]] | ||
| + | | [[File:aF Kapp'n Lv. 5 Outfit.png|64px]] | ||
| + | | [[File:aF Kapp'n Lv. 6 Outfit.png|64px]] | ||
| + | |- | ||
| + | | [[File:Kicks aF Character Icon.png|64px]]<br>[[Kicks]] | ||
| + | | [[File:aF Kicks.png|64px]] | ||
| + | | [[File:aF Kicks Lv. 2 Outfit.png|64px]] | ||
| + | | [[File:aF Kicks Lv. 3 Outfit.png|64px]] | ||
| + | | [[File:aF Kicks Lv. 4 Outfit.png|64px]] | ||
| + | | [[File:aF Kicks Lv. 5 Outfit.png|64px]] | ||
| + | | [[File:aF Kicks Lv. 6 Outfit.png|64px]] | ||
| + | |- | ||
| + | | [[File:Lottie aF Character Icon.png|64px]]<br>[[Lottie]] | ||
| + | | [[File:aF Lottie.png|64px]] | ||
| + | | [[File:aF Lottie Lv. 2 Outfit.png|64px]] | ||
| + | | [[File:aF Lottie Lv. 3 Outfit.png|64px]] | ||
| + | | [[File:aF Lottie Lv. 4 Outfit.png|64px]] | ||
| + | | [[File:aF Lottie Lv. 5 Outfit.png|64px]] | ||
| + | | [[File:aF Lottie Lv. 6 Outfit.png|64px]] | ||
| + | |- | ||
| + | | [[File:Mabel aF Character Icon.png|64px]]<br>[[Mabel]] | ||
| + | | [[File:aF Mabel.png|64px]] | ||
| + | | [[File:aF Mabel Lv. 2 Outfit.png|64px]] | ||
| + | | [[File:aF Mabel Lv. 3 Outfit.png|64px]] | ||
| + | | [[File:aF Mabel Lv. 4 Outfit.png|64px]] | ||
| + | | [[File:aF Mabel Lv. 5 Outfit.png|64px]] | ||
| + | | [[File:aF Mabel Lv. 6 Outfit.png|64px]] | ||
| + | |- | ||
| + | | [[File:Resetti aF Character Icon.png|64px]]<br>[[Mr. Resetti]] | ||
| + | | [[File:aF Mr. Resetti.png|64px]] | ||
| + | | [[File:aF Mr. Resetti Lv. 2 Outfit.png|64px]] | ||
| + | | [[File:aF Mr. Resetti Lv. 3 Outfit.png|64px]] | ||
| + | | [[File:aF Mr. Resetti Lv. 4 Outfit.png|64px]] | ||
| + | | [[File:aF Mr. Resetti Lv. 5 Outfit.png|64px]] | ||
| + | | [[File:aF Mr. Resetti Lv. 6 Outfit.png|64px]] | ||
| + | |- | ||
| + | | [[File:Reese aF Character Icon.png|64px]]<br>[[Reese]] | ||
| + | | [[File:aF Reese.png|64px]] | ||
| + | | [[File:aF Reese Lv. 2 Outfit.png|64px]] | ||
| + | | [[File:aF Reese Lv. 3 Outfit.png|64px]] | ||
| + | | [[File:aF Reese Lv. 4 Outfit.png|64px]] | ||
| + | | [[File:aF Reese Lv. 5 Outfit.png|64px]] | ||
| + | | [[File:aF Reese Lv. 6 Outfit.png|64px]] | ||
| + | |- | ||
| + | | [[File:Rover aF Character Icon.png|64px]]<br>[[Rover]] | ||
| + | | [[File:aF Rover.png|64px]] | ||
| + | | [[File:aF Rover Lv. 2 Outfit.png|64px]] | ||
| + | | [[File:aF Rover Lv. 3 Outfit.png|64px]] | ||
| + | | [[File:aF Rover Lv. 4 Outfit.png|64px]] | ||
| + | | [[File:aF Rover Lv. 5 Outfit.png|64px]] | ||
| + | | [[File:aF Rover Lv. 6 Outfit.png|64px]] | ||
| + | |- | ||
| + | | [[File:Nooklings aF Character Icon.png|64px]]<br>[[Timmy and Tommy]] | ||
| + | | [[File:aF Timmy & Tommy.png|64px]] | ||
| + | | [[File:aF Timmy & Tommy Lv. 2 Outfit.png|64px]] | ||
| + | | [[File:aF Timmy & Tommy Lv. 3 Outfit.png|64px]] | ||
| + | | [[File:aF Timmy & Tommy Lv. 4 Outfit.png|64px]] | ||
| + | | [[File:aF Timmy & Tommy Lv. 5 Outfit.png|64px]] | ||
| + | | [[File:aF Timmy & Tommy Lv. 6 Outfit.png|64px]] | ||
| + | |- | ||
| + | | [[File:Tom Nook aF Character Icon.png|64px]]<br>[[Tom Nook]] | ||
| + | | [[File:aF Tom Nook.png|64px]] | ||
| + | | [[File:aF Tom Nook Lv. 2 Outfit.png|64px]] | ||
| + | | [[File:aF Tom Nook Lv. 3 Outfit.png|64px]] | ||
| + | | [[File:aF Tom Nook Lv. 4 Outfit.png|64px]] | ||
| + | | [[File:aF Tom Nook Lv. 5 Outfit.png|64px]] | ||
| + | | [[File:aF Tom Nook Lv. 6 Outfit.png|64px]] | ||
| + | |- | ||
| + | | [[File:Boy 1 aF Character Icon.png|64px]]<br>Boy 1 | ||
| + | | [[File:aF Boy 1.png|64px]] | ||
| + | | - | ||
| + | | - | ||
| + | | - | ||
| + | | - | ||
| + | | - | ||
| + | |- | ||
| + | | [[File:Boy 2 aF Character Icon.png|64px]]<br>Boy 2 | ||
| + | | [[File:aF Boy 2.png|64px]] | ||
| + | | - | ||
| + | | - | ||
| + | | - | ||
| + | | - | ||
| + | | - | ||
| + | |- | ||
| + | | [[File:Boy 3 aF Character Icon.png|64px]]<br>Boy 3 | ||
| + | | [[File:aF Boy 3.png|64px]] | ||
| + | | - | ||
| + | | - | ||
| + | | - | ||
| + | | - | ||
| + | | - | ||
| + | |- | ||
| + | | [[File:Boy 4 aF Character Icon.png|64px]]<br>Boy 4 | ||
| + | | [[File:aF Boy 4.png|64px]] | ||
| + | | - | ||
| + | | - | ||
| + | | - | ||
| + | | - | ||
| + | | - | ||
| + | |- | ||
| + | | [[File:Girl 1 aF Character Icon.png|64px]]<br>Girl 1 | ||
| + | | [[File:aF Girl 1.png|64px]] | ||
| + | | - | ||
| + | | - | ||
| + | | - | ||
| + | | - | ||
| + | | - | ||
| + | |- | ||
| + | | [[File:Girl 2 aF Character Icon.png|64px]]<br>Girl 2 | ||
| + | | [[File:aF Girl 2.png|64px]] | ||
| + | | - | ||
| + | | - | ||
| + | | - | ||
| + | | - | ||
| + | | - | ||
| + | |- | ||
| + | | [[File:Girl 3 aF Character Icon.png|64px]]<br>Girl 3 | ||
| + | | [[File:aF Girl 3.png|64px]] | ||
| + | | - | ||
| + | | - | ||
| + | | - | ||
| + | | - | ||
| + | | - | ||
| + | |- | ||
| + | | [[File:Girl 4 aF Character Icon.png|64px]]<br>Girl 4 | ||
| + | | [[File:aF Girl 4.png|64px]] | ||
| + | | - | ||
| + | | - | ||
| + | | - | ||
| + | | - | ||
| + | | - | ||
|} | |} | ||
| Line 855: | Line 840: | ||
{{Image}} | {{Image}} | ||
| − | {{To-do| | + | {{To-do|Expand on the board layouts|Add features' effects on the board|What happens if there is a tie with Happy Points?}} |
| − | + | {{Navbox aF}} | |
Latest revision as of 19:05, January 5, 2024
The Board Game, also known as the Animal Crossing Board Game, is the main mode in Animal Crossing: amiibo Festival. In the Board Game, one to four players scan an Animal Crossing amiibo figure and play as the corresponding character. The game takes place within a town, and the players roll a die to move across spaces, which have different effects. The goal is to earn the most Happy Points.
Gameplay[edit]
Before each game, the players can scan in amiibo figures; players can also play without amiibo as long at least one is using one. In games with less than four players, computer players use the avatar of a player character; this avatar is also used for non-amiibo players. The turn order is then selected, and the player chooses which month to play in, which determines which events occur during the game.
The Board Game has two main spaces: pink spaces and purple spaces. Pink spaces give either Happy Points or Bells, and purple spaces take away Happy Points or Bells. Each game begins at the beginning of the selected month, and each turn is a single day in the month; the game ends at the end of the month, meaning each game has 28 to 31 turns. Players also have the option to set a time limit of either 30, 45, or 60 minutes on the game,[nb 1] and to turn on hints that appear throughout the game.
Each player scans their respective amiibo figure to roll a die each turn, determining how many spaces they travel. When they land on a space, a scenario involving the player plays out, with the outcome either rewarding or removing Happy Points or Bells. In addition to scanning their respective amiibo figure, players can scan a resident's amiibo card to have them appear and roll a special die with only the number that is on the card; each player can only do this five times per game.
At the end of the game, the host counts the number of Bells each player has; every 1,000 Bells awards 1 Happy Point. The player with the most Happy Points wins, and the player can review statistics for each player, including the final number of Happy Points, number of spaces moved, number of pink and purple spaces landed on, profit made from turnips, and profit made from Katrina's tarot cards. After the game, each player's Happy Points are saved to their respective amiibo figure to level the character up.
After the player completes the Board Game for the first time, they unlock the ability to select the month the game takes place in; the game uses the current month set on the Wii U for the first playthrough. After a second completion of the Board Game, the plaza is unlocked, where the player can access minigames. After a third completion, the ability to customize the Board Game town is unlocked.
Collectibles[edit]
| Collectible | Usage |
|---|---|
Happy Points |
The main collectible in the game; the player with the most Happy Points at the end of a game wins. Each player begins the game with 10 Happy Points, and Happy Points can be earned from some pink spaces, certain events, and certain visitors. Additionally, each time a player using amiibo rolls the die, they receive 1 Happy Point. After each game, the players' Happy Points are saved to their amiibo, which can level up the character. |
Bells |
Used as currency to buy turnips from Joan and cards from Redd. At the end of a game, each player receives 1 Happy Point for every 1,000 Bells they have. Each player begins the game with 2,000 Bells, and Bells can be earned from some pink spaces, from selling turnips, from certain events, and from certain visitors. If the player has negative Bells at the end of their turn, they lose one Happy Point. |
 Turnips |
Used as selling items to earn Bells from the stalk market. Turnips can be purchased from Joan each Sunday; on the first Sunday of each game, Joan also gives all players 10 turnips. Turnips can also be obtained from Joan's visits and from collecting green or rainbow feathers during Festivale. |
Spaces[edit]
Visitors[edit]
Occasionally, a special character visits the town for a turn, turning certain spaces into special-event spaces.
| Visitor | Special-event space | Effect |
|---|---|---|
Dr. Shrunk |

|
Dr. Shrunk chooses a joke at random out of four—three dice and one "special schtick"—and tells it to the player. If he chooses a joke about the die number, he gives the player a move card with a matching die value. If he chooses to do his "special schtick", he gives the player a random non-move card. |
Katie |
If the player does not have any cards, Katie draws a move card. She then asks the player if they think the next card she draws will have a higher or lower die value. If the player is correct, Katie gives the player the second card. If the player is incorrect, nothing happens.
If the player has a card, Katie instead asks them to trade for a random non-move card. | |
Katrina |
The player arrives at the fortune-teller's shop. Several tarot cards appear on the GamePad, and the player must select one. The card rewards the player with Happy Points and/or Bells when a specific die value is rolled by any player for one week (seven turns). The drawn card has a chance of being reversed, where it will take away Happy Points and/or Bells when a specific die value is rolled.
Tarot cards: | |
Joan |

|
Joan either gives the player 10 to 30 turnips, makes them pay 1,000 Bells to "help make things right" after her turnip field was vandalized, or tells the player that all their turnips are spoiled and can no longer be used. |
Phineas |

|
Phineas spins a roulette to see who wins a prize; each player has a section on the roulette, with the player who landed on the special-event space having a larger section. The player it lands on receives 2,000 to 3,000 Bells. There is also a rainbow-colored section on the roulette; if it lands on it, all players receive 5 Happy Points and 1,000 Bells. |
Redd |
The player visits Crazy Redd's Card Shop, where they can purchase one of four cards for 100 Bells. In addition to the purchase cost, cards cost Bells to use, with the exception of the Change Money Card. |
Cards[edit]
Cards are items that give the player a unique ability in place of their standard die roll. They are received from Dr. Shrunk, Katie, and Redd when they visit town; if a player purchases a card from Redd, the card also has a usage cost. Each player can hold up to two cards.
Events[edit]
Various events occur throughout each month that change the game for one or two days. Some events only occur in the North American, European, or Japanese version of the game.
| Event | Date | Description |
|---|---|---|
Opposite Day |
Random day after the 20th of each month[nb 2] | Players move backward and the effects of spaces and tarot cards are reversed. Additionally, a space's turnip prices are not revealed until a player lands on it. |
Twice Dice Day |
11th and 22nd day of each month[nb 2] | Each player rolls two dice instead of one. If both of a player's rolls match, they receive bonus Happy Points. |
Stalk Market Closed |
Random, cannot occur on Sunday[nb 2] | Players cannot sell turnips for one day. |
Birthday |
The birthday of one of the players' amiibo characters or the host of the game | All visitor spaces become birthday spaces.
If it is the host's birthday, landing on a birthday space causes the player to meet the host in front of the town tree, and they offer the player either 5 Happy Points or 3,000 Bells. If it is the birthday of one of the players, landing on a birthday space has a different effect depending on who lands on it. If the birthday player lands on it, they receive 10 Happy Points, and if a non-birthday player lands on it, they receive 3 Happy Points and the birthday player receives 5. |
Fishing Tourney |
2nd Saturday of February, April, October, and December 3rd Saturday of January, March, May, and November |
Chip appears and all spaces become fishing-rod spaces. When a space is landed on, the player catches a random fish. Silver and gold spaces have a higher chance of holding a larger fish. At the end of the turn, the players appear in Chip's tent for an awards ceremony; players are scored based on the size of the largest fish they caught during the day. The first-place player receives 20 Happy Points, the second-place player receives 15, the third-place player receives 10, and the fourth-place player receives 5. |
Bug-Off |
3rd Saturday of June, July, August, and September | Nat appears and all spaces become net spaces. When a space is landed on, the player catches a random bug. Silver and gold spaces have a higher chance of holding a rarer bug. At the end of the turn, the players appear in Nat's tent for an awards ceremony; players are scored based on the rarity of the rarest bug they caught during the day. The first-place player receives 20 Happy Points, the second-place player receives 15, the third-place player receives 10, and the fourth-place player receives 5. |
New Year's Day |
January 1 | Scenarios themed around the event can occur when landing on spaces. |
Festivale |
Day in February or March (varies per year) | Pavé appears and all spaces turn into feather spaces. When a space is landed on, the player receives the feather indicated on the space and Pavé awards them a prize. Yellow feathers give 3,000 Bells, red feathers give 10 Happy Points, green feathers give 10 turnips, and rainbow feathers give 10 Happy Points, 3,000 Bells, and 10 turnips. |
Groundhog Day |
February 2[nb 3] | Scenarios themed around the event can occur when landing on spaces. |
Setsubun |
February 3[nb 4] | Scenarios themed around the event can occur when landing on spaces. |
Valentine's Day |
February 14 | Scenarios themed around the event can occur when landing on spaces. |
Doll's Festival |
March 3[nb 4] | Scenarios themed around the event can occur when landing on spaces. |
White Day |
March 14[nb 4] | Scenarios themed around the event can occur when landing on spaces. |
Shamrock Day |
March 17[nb 3] | Scenarios themed around the event can occur when landing on spaces. |
Bunny Day |
Day in March or April (varies per year) | Zipper T. Bunny appears and all spaces turn into egg spaces. When a space is walked over, the player receives eggs, and after they stop moving, they receive a corresponding number of Happy Points. Green spaces give 1–2 eggs, silver spaces give 4–5 eggs, and gold spaces give 10 eggs. |
April Fools' Day |
April 1 | Scenarios themed around the event can occur when landing on spaces. |
Nature Day |
April 22 | Scenarios themed around the event can occur when landing on spaces. |
Weeding Day |
Last Friday of April | Scenarios themed around the event can occur when landing on spaces. |
Children's Day |
May 5[nb 4] | Scenarios themed around the event can occur when landing on spaces. |
Mother's Day |
2nd Sunday of May | Scenarios themed around the event can occur when landing on spaces. |
Father's Day |
3rd Sunday of June | Scenarios themed around the event can occur when landing on spaces. |
Summer Solstice |
June 21 | Scenarios themed around the event can occur when landing on spaces. |
Tanabata |
March 14[nb 4] | Scenarios themed around the event can occur when landing on spaces. |
Marine Day |
July 18[nb 4] | Scenarios themed around the event can occur when landing on spaces. |
Fireworks Show |
Each Sunday in August | Redd appears in a stall and special-event spaces appear on the board. Landing on one of these spaces brings the player to the stall, where they can purchase a Happy Fox Fortune for 100 Bells. Additionally, scenarios themed around the event can occur when landing on spaces.
Happy Fox Fortunes:
|
Obon |
August 15[nb 4] | Scenarios themed around the event can occur when landing on spaces. |
Autumn Moon |
Day in September or October (varies per year) | Scenarios themed around the event can occur when landing on spaces. |
Labor Day |
1st Monday of September | Scenarios themed around the event can occur when landing on spaces. |
Explorer's Day |
2nd Monday of October | Scenarios themed around the event can occur when landing on spaces. |
Halloween |
October 31 | Jack appears on October 1 and scatters pieces of candy across the town. Throughout the month, players can collect the candy; candy appears floating between spaces in groups of 3 or 5. At the end of the day on October 31, Jack appears again and depending on how much candy was collected in total, gives all the players Happy Points. If 180 or more pieces of candy were collected throughout the month, Jack gives all players 20 Happy Points. He then gives each player a different amount of bonus Happy Points based on how much candy they collected; first-place receives 20 Happy Points, second-place receives 15, third-place receives 10, and fourth-place receives 5. |
Harvest Festival |
4th Wednesday and Thursday of November | Franklin appears the day before the Harvest Festival and asks the players to bring him three ingredients. During both days, spaces become ingredient spaces, which when landed on give the player the ingredient indicated on the space. Each ingredient collected awards the player Happy Points. On the day of the Harvest Festival, Franklin asks the players to collect a secret ingredient. At the end of the turn, Franklin uses the players' ingredients to cook a dish, and each player receives Happy Points; the more ingredients are brought to Franklin, the more Happy Points are received. |
Naughty-or-Nice Day |
December 6[nb 5] | Scenarios themed around the event can occur when landing on spaces. |
Winter Solstice |
December 21 | Scenarios themed around the event can occur when landing on spaces. |
Toy Day |
December 24 | Jingle appears and gives all players 5 Happy Points and 3,000 Bells. |
New Year's Eve |
December 31 | Scenarios themed around the event can occur when landing on spaces. |
Stalk market[edit]
Each Sunday after the first week of the game, Joan visits and gives each player the option to purchase turnips with Bells; the first time she visits, she also gives each player 10 free turnips. Throughout the week, the player can sell them on each space, each of which has a different price. Each Monday, the host tells the players which trend the stalk market is in for the week: steady, fluctuating, or crashing. If the player has turnips on a Saturday or the final day of the game, they are automatically sold at the space they land on, unless the stalk market happens to be closed on that day.
Gyroid Stamp Spot[edit]
On each corner of the board, there is a Gyroid Stamp Spot. If a player passes the spot, they will have one-quarter of a card stamped, revealing an image of a character, and the player earns Happy Points. Once all four sections of a stamp have been filled in, the card can be stamped two more times to add additional elements to the image. Once the stamp is completed, subsequent passes of the Gyroid Stamp Spot still give the player Happy Points. There are a total of 26 stamps, and they vary by month.
- 1 stamp – 5 Happy Points
- 2 stamps – 10 Happy Points
- 3 stamps – 15 Happy Points
- 4 stamps – 30 Happy Points
- 5 or more stamps – 5 Happy Points
List of stamps[edit]
Board and town[edit]
There are eight possible board layouts, with each having different paths. One is chosen at random the first time the Board Game is played, and it cannot be changed afterward.
After the player completes three games, the option to customize the board-game town is unlocked. Before each game, the player can select the option on the GamePad. When customizing the town, the player can invite villagers to move in by scanning their amiibo cards, and spend Happy Tickets on new features.
Villagers[edit]
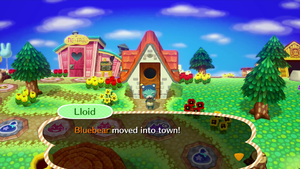
By default, the board-game town is inhabited by Goldie, Rosie, and Stitches. When moving in a villager, the player has the option to build their home on an open plot of land. If the amiibo card has Animal Crossing: Happy Home Designer home data on it, the house built will match the data on the card. If the maximum of eight villager houses are occupied, the player can replace an existing villager and house. If a villager already lives in the town, the player can build a new house for them.
Villagers appear throughout the town and in scenarios, and one random villager is the host of each game. Goldie is always the host of the first game.
Features[edit]
Features are similar to public works projects from Animal Crossing: New Leaf. They can be built in exchange for Happy Tickets, and once built they can unlock new scenarios and paths on the board. Most features can be demolished once built, but some cannot. There are a total of 30 features:
| Feature | Image | Cost | Effect on board | Can demolish |
|---|---|---|---|---|
| Flowerbed | 
|
Yes | ||
| Orchard | 
|
Yes | ||
| Lotus pond | 
|
Yes | ||
| Forest glade | 
|
Yes | ||
| Meeting place | 
|
Yes | ||
| Campfire | 
|
Yes | ||
| Well | 
|
Yes | ||
| Wheat field | 
|
Yes | ||
| Bamboo forest | 
|
Yes | ||
| Fountain park | 
|
Yes | ||
| Playground | 
|
Yes | ||
| Sandbox | 
|
Yes | ||
| Statue fountain | 
|
Yes | ||
| Illuminations | 
|
Yes | ||
| Rose garden | 
|
Yes | ||
| Topiary garden | 
|
Yes | ||
| Zen garden | 
|
Yes | ||
| Fairy-tale park | 
|
Yes | ||
| Brunch spot | 
|
Yes | ||
| Stonehenge | 
|
Yes | ||
| Lighthouse | 
|
Yes | ||
| Windmill | 
|
Yes | ||
| Power plant | 
|
Yes | ||
| Public restroom | 
|
Yes | ||
| Pool | 
|
Yes | ||
| Outdoor theater | 
|
Yes | ||
| Campsite | 
|
No | ||
| Police station | 
|
No | ||
| Reset Center | 
|
No | ||
| Café | 
|
No |
Characters[edit]
Every character with an Animal Crossing amiibo figure is playable in the Board Game. Player characters are reserved for computer players and non-amiibo players, and they cannot be leveled up. Each amiibo character can level up by collecting Happy Points; each level-up unlocks a new outfit and emotion for that character.
- Lv. 1 – Default
- Lv. 2 – 200 Happy Points
- Lv. 3 – 700 Happy Points
- Lv. 4 – 1,500 Happy Points
- Lv. 5 – 3,000 Happy Points
- Lv. 6 – 7,000 Happy Points
| Name | Default outfit | Lv. 2 outfit | Lv. 3 outfit | Lv. 4 outfit | Lv. 5 outfit | Lv. 6 outfit |
|---|---|---|---|---|---|---|
Blathers |

|

|

|

|

|

|
Celeste |

|

|

|

|

|

|
Cyrus |

|

|

|

|

|

|
Digby |

|

|

|

|

|

|
Isabelle[nb 6] |
 
|

|

|

|

| |
K.K. Slider |

|

|

|

|

|

|
Kapp'n |

|

|

|

|

|

|
Kicks |

|

|

|

|

|

|
Lottie |

|

|

|

|

|

|
Mabel |

|

|

|

|

|

|
Mr. Resetti |

|

|

|

|

|

|
Reese |

|

|

|

|

|

|
Rover |

|

|

|

|

|

|
Timmy and Tommy |

|

|

|

|

|

|
Tom Nook |

|

|

|

|

|

|
Boy 1 |

|
- | - | - | - | - |
Boy 2 |

|
- | - | - | - | - |
Boy 3 |

|
- | - | - | - | - |
Boy 4 |

|
- | - | - | - | - |
Girl 1 |

|
- | - | - | - | - |
Girl 2 |

|
- | - | - | - | - |
Girl 3 |

|
- | - | - | - | - |
Girl 4 |

|
- | - | - | - | - |
Notes[edit]
- ↑ If a time limit is set, the game ends two days after the day it expires on.
- ↑ 2.0 2.1 2.2 Does not appear on the calendar.
- ↑ 3.0 3.1 This event only occurs in the North American version of the game.
- ↑ 4.0 4.1 4.2 4.3 4.4 4.5 4.6 This event only occurs in the Japanese version of the game.
- ↑ This event only occurs in the European version of the game.
- ↑ Isabelle's default outfit and Lv. 2 outfit differ between the Summer Outfit and Winter Outfit amiibo figures.
- Expand on the board layouts
- Add features' effects on the board
- What happens if there is a tie with Happy Points?
- Expand on the board layouts
- Add features' effects on the board
- What happens if there is a tie with Happy Points?
| Animal Crossing: amiibo Festival | ||||||||||
|---|---|---|---|---|---|---|---|---|---|---|
| ||||||||||
